

Most people write a blog post, make one pin for it and move on. That one pin has one picture, one headline and one description, so it can be found for one kind of search. Five pins for the same post give you five chances. This guide shows what to change between pins, how many to make, and a fast way to make them.
The quick answer
- Make 5 to 10 pins for each blog post that matters to you.
- Change four things between pins: the photo, the layout, the headline and the description.
- Aim each pin at a different search phrase.
- Post them days apart, not all at once.
Why one blog post deserves many pins
- Pinterest is a search engine. People type what they want. A recipe can answer “easy dinner ideas”, “weeknight meals” and “30 minute recipes”. One pin cannot aim at all three well.
- A new picture is a new pin. Pinterest treats a pin with a new picture as fresh, even when it links to a page you have pinned before.
- You cannot guess the winner. One picture often does far better than the others. You only find it when you try several.
- Pins last. A pin is found through search for months. The work you do today keeps paying.
What to change between pins
| Part | How to change it | Example |
|---|---|---|
| Photo | Use a different photo from the post on each pin | The finished dish, then the ingredients, then one step |
| Layout | Move the headline, or use two or three photos | Photo on top with words below, then words over the photo |
| Headline | Say the same promise in another way | “30-minute chicken pasta”, then “Dinner in one pan” |
| Pin title | Lead with a different search phrase (up to 100 characters) | “Easy weeknight dinner idea” |
| Description | Use two or three different keywords (up to 800 characters) | One about speed, one about the ingredients |
| Colours | Keep to your brand colours, but vary the background | Cream on one pin, navy on the next |
Keep two things the same on every pin: the link, and the tall 2:3 shape. Pinterest recommends 1,000 × 1,500 pixels.
How to choose your keywords
- Open Pinterest and click the search box.
- Type the subject of your post, such as “chicken pasta”.
- Read the suggestions under the box. These are phrases people really search for.
- Write down five to ten that fit your post.
- Give each pin two or three of them.
Put the keywords in real sentences. A description that is only a list of keywords reads as spam to people and to Pinterest.
The slow way: make each pin by hand
- Open a design tool and start a 1,000 × 1,500 picture.
- Add a photo from your post and type a headline.
- Save it. Copy it, change the photo and the headline, and save again.
- Repeat for each pin.
- Upload each picture to Pinterest and type its title, description, link and board.
This works, and it gives you full control. Ten pins take most people an hour or more.
The fast way: Posttyy's Bulk pins
Posttyy makes the pins from the blog post itself. You need a Posttyy account with Pinterest connected.
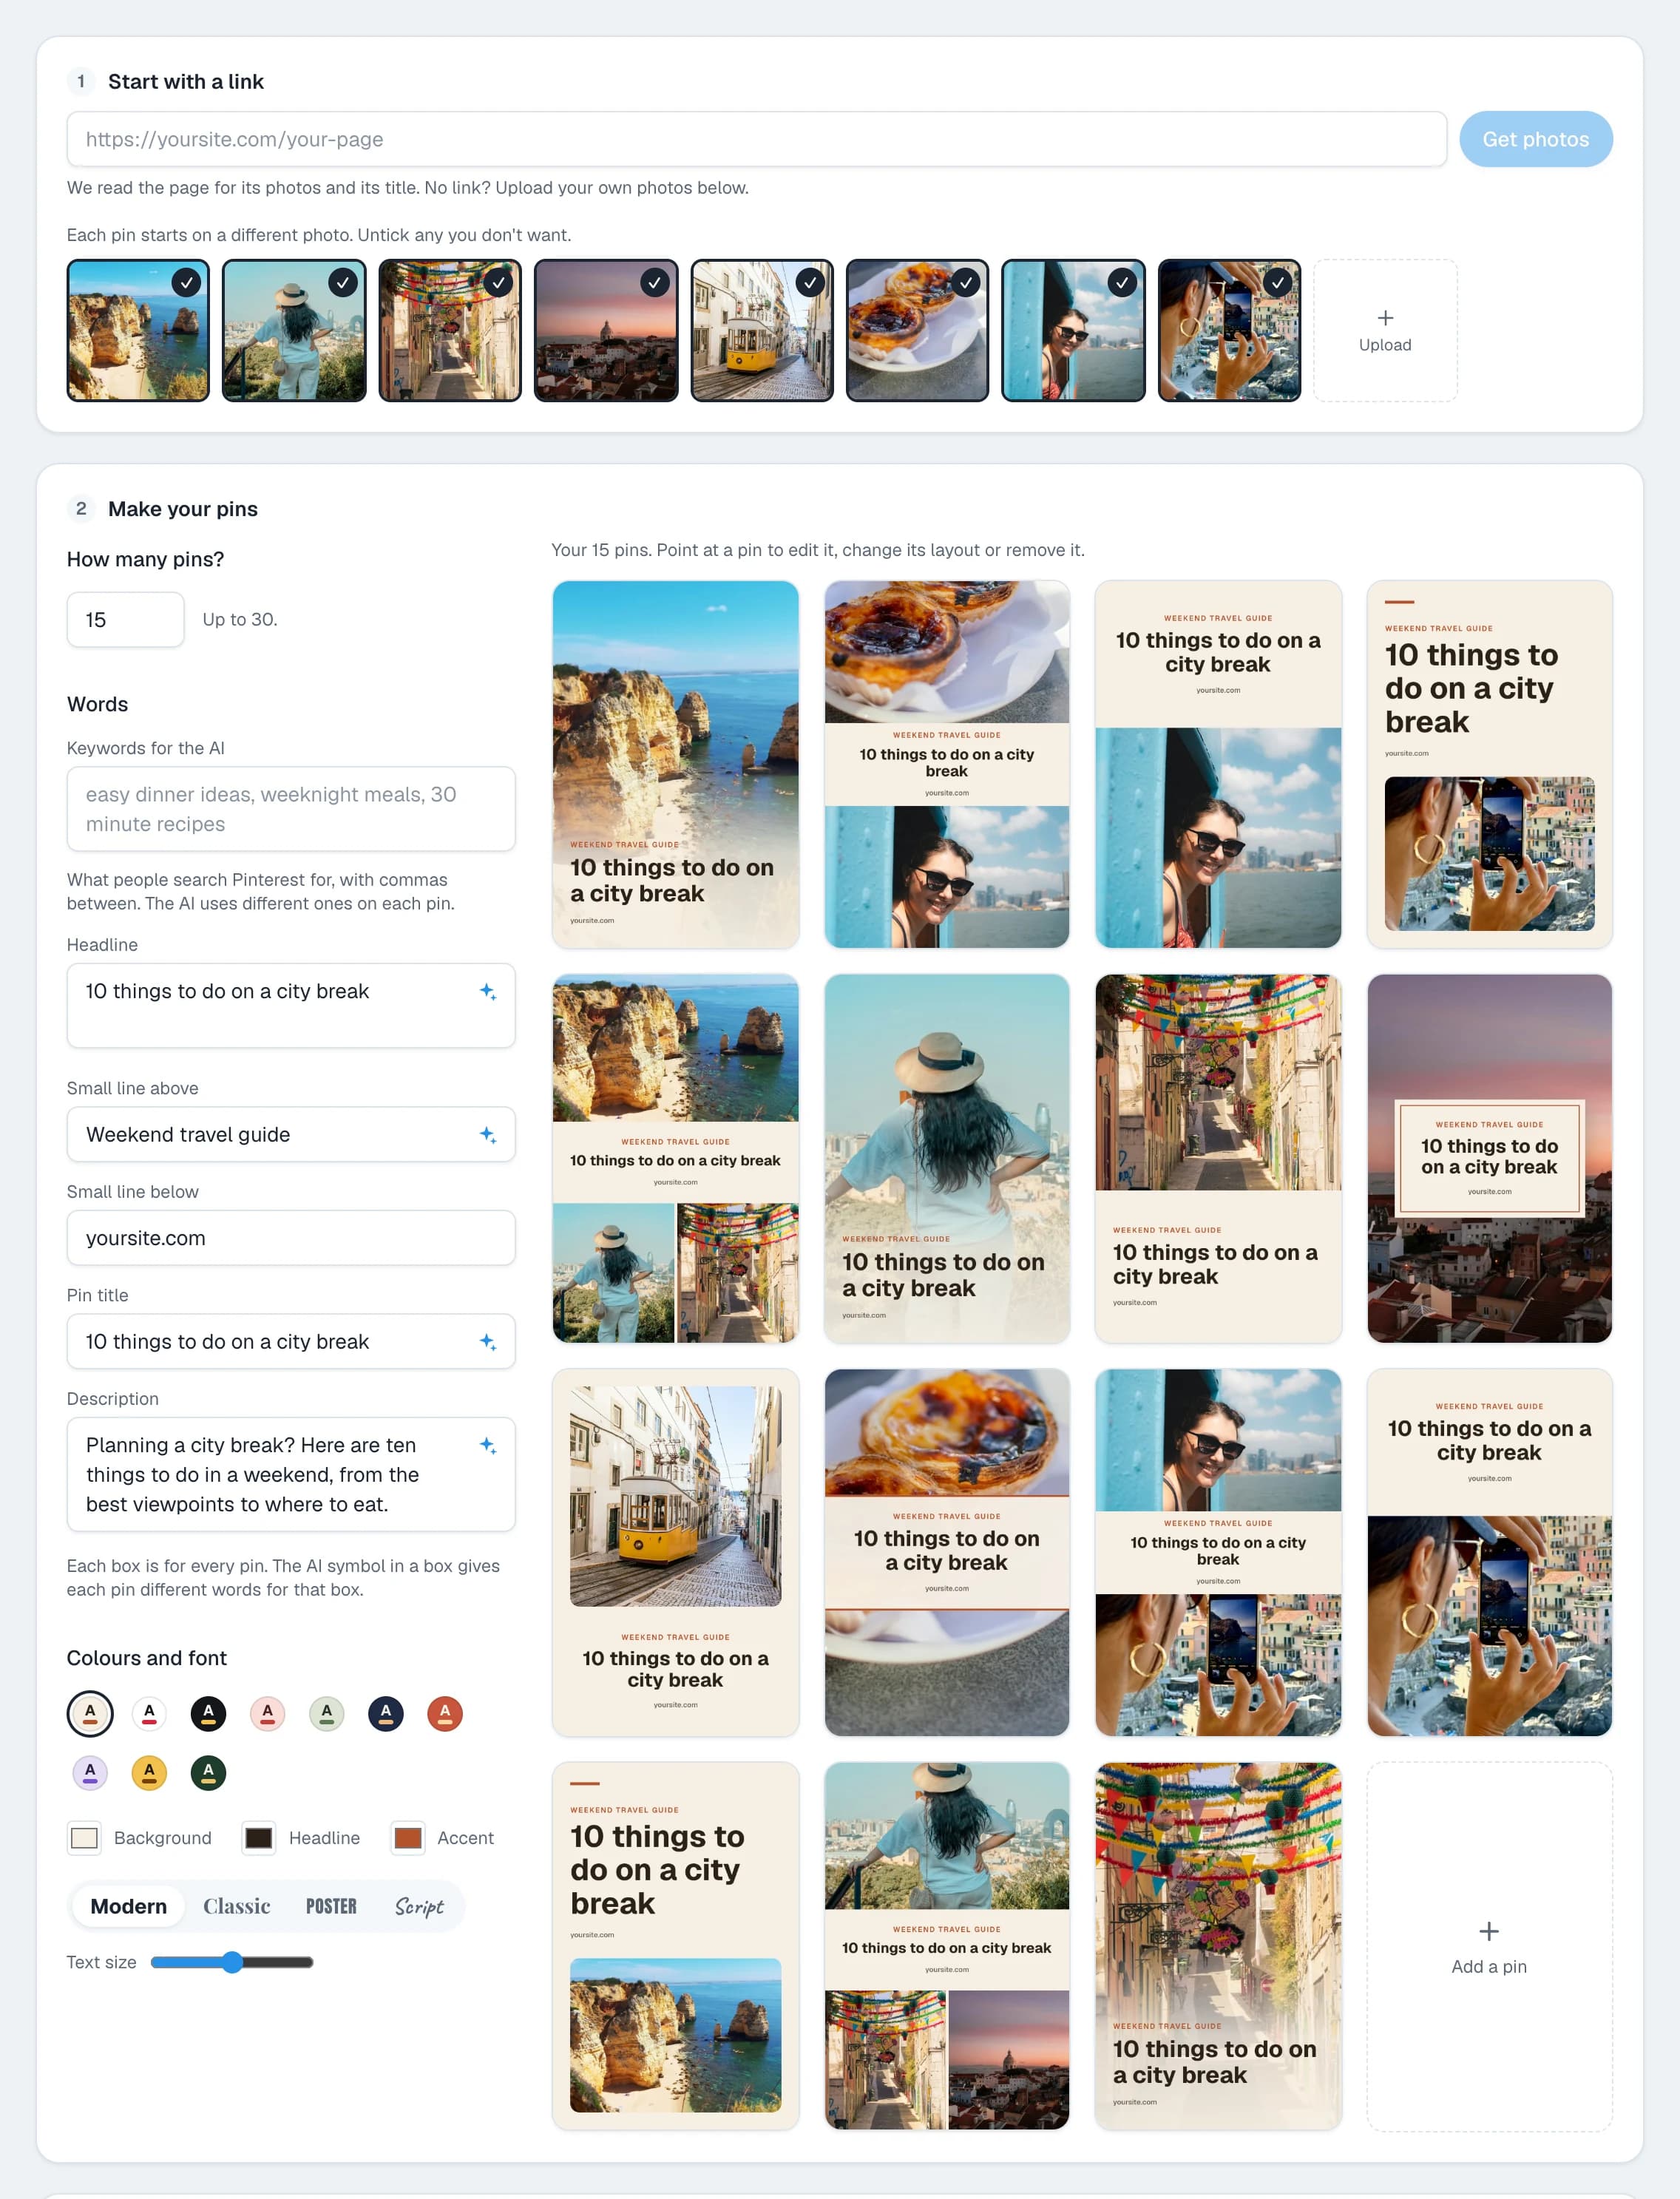
- Open Bulk pins in the sidebar.
- Paste the address of your blog post and press Get photos. Posttyy reads the page for its photos and its title.
- Under How many pins?, type a number up to 30. Each pin starts on a different photo and a different layout.
- Type your search phrases in Keywords for the AI, with commas between.
- Click the AI symbol in the Headline, Pin title and Description boxes. Posttyy writes different words for each pin and uses different keywords on each.
- Point at any pin to edit it, change its layout or remove it.
- Pick a Board, a Start on day and the number of Pins a day.
- Press the Schedule button.
The AI is optional. Without it, each pin takes its headline from the page's title, and you can type the words yourself. The guide to bulk posting on Pinterest explains each step in full.
How to space the pins out
- One pin a day for each blog post. Ten pins then last ten days.
- Run several posts together. Three blog posts at one pin a day each gives your account three pins a day, all to different pages.
- Avoid a fixed pattern. Do not pin at 9:00 exactly every day. Posttyy moves each time by a few minutes for you.
- Use more than one board when it fits. A pasta recipe can go on “Dinner ideas” and on “Pasta recipes”. Do not put it on a board it does not belong to.
Check which pin worked
- Wait two to four weeks. Pins start slowly.
- On Pinterest, open your analytics and sort your pins by outbound clicks.
- Find the pin that sent the most visitors to your post.
- Look at what is different about it: the photo, the headline or the keywords.
- Make your next batch more like that pin.
Common questions
How many pins should I make for one blog post?
Start with 5 to 10. That is enough to try different photos, headlines and keywords without repeating yourself. Add more later for the posts that do well.
Is it spam to pin the same link many times?
Not when each pin is different and they are spread over days. What Pinterest treats as spam is the same picture posted again and again, or many pins to one link in a few minutes.
Can the pins use the same photo?
They can, but change the layout, crop and headline so the picture is new. A different photo on each pin is better when the post has enough photos.
Should every pin go to the same board?
Use the board that fits the post best. Add a second board only when the post truly belongs there too.
Does this work for product pages?
Yes. Any page with photos works: a product, a recipe, a guide or a portfolio piece.
To schedule a single pin, see the guide to scheduling Pinterest pins.