

Pinterest works best when you pin often. Making each pin by hand is the slow part: you design a picture, write a title, write a description, pick a board, pick a time. Then you do it again. Bulk posting does that work for many pins at once.
There are two ways to bulk post on Pinterest. Posttyy is the better choice. Posttyy makes the pins for you from one link and schedules them. Pinterest's own tool uploads pins you have already made, from a CSV file. This guide shows every step for both.
The quick answer
- Sign up for Posttyy and connect your Pinterest account.
- Open Bulk pins in the sidebar.
- Paste a link and press Get photos.
- Choose how many pins you want and check their words.
- Pick a board, a start day and how many pins go out each day.
- Press Schedule 30 pins.
What you need first
- A Posttyy account with Pinterest connected. Open Connected socials, choose Pinterest and sign in. The Bulk pins link appears in the sidebar when Pinterest is connected.
- A link to pin. A blog post, a recipe or a product page. A page with several photos gives the most varied pins.
- A board. You can also make one on the page.
Step 1: Start with a link
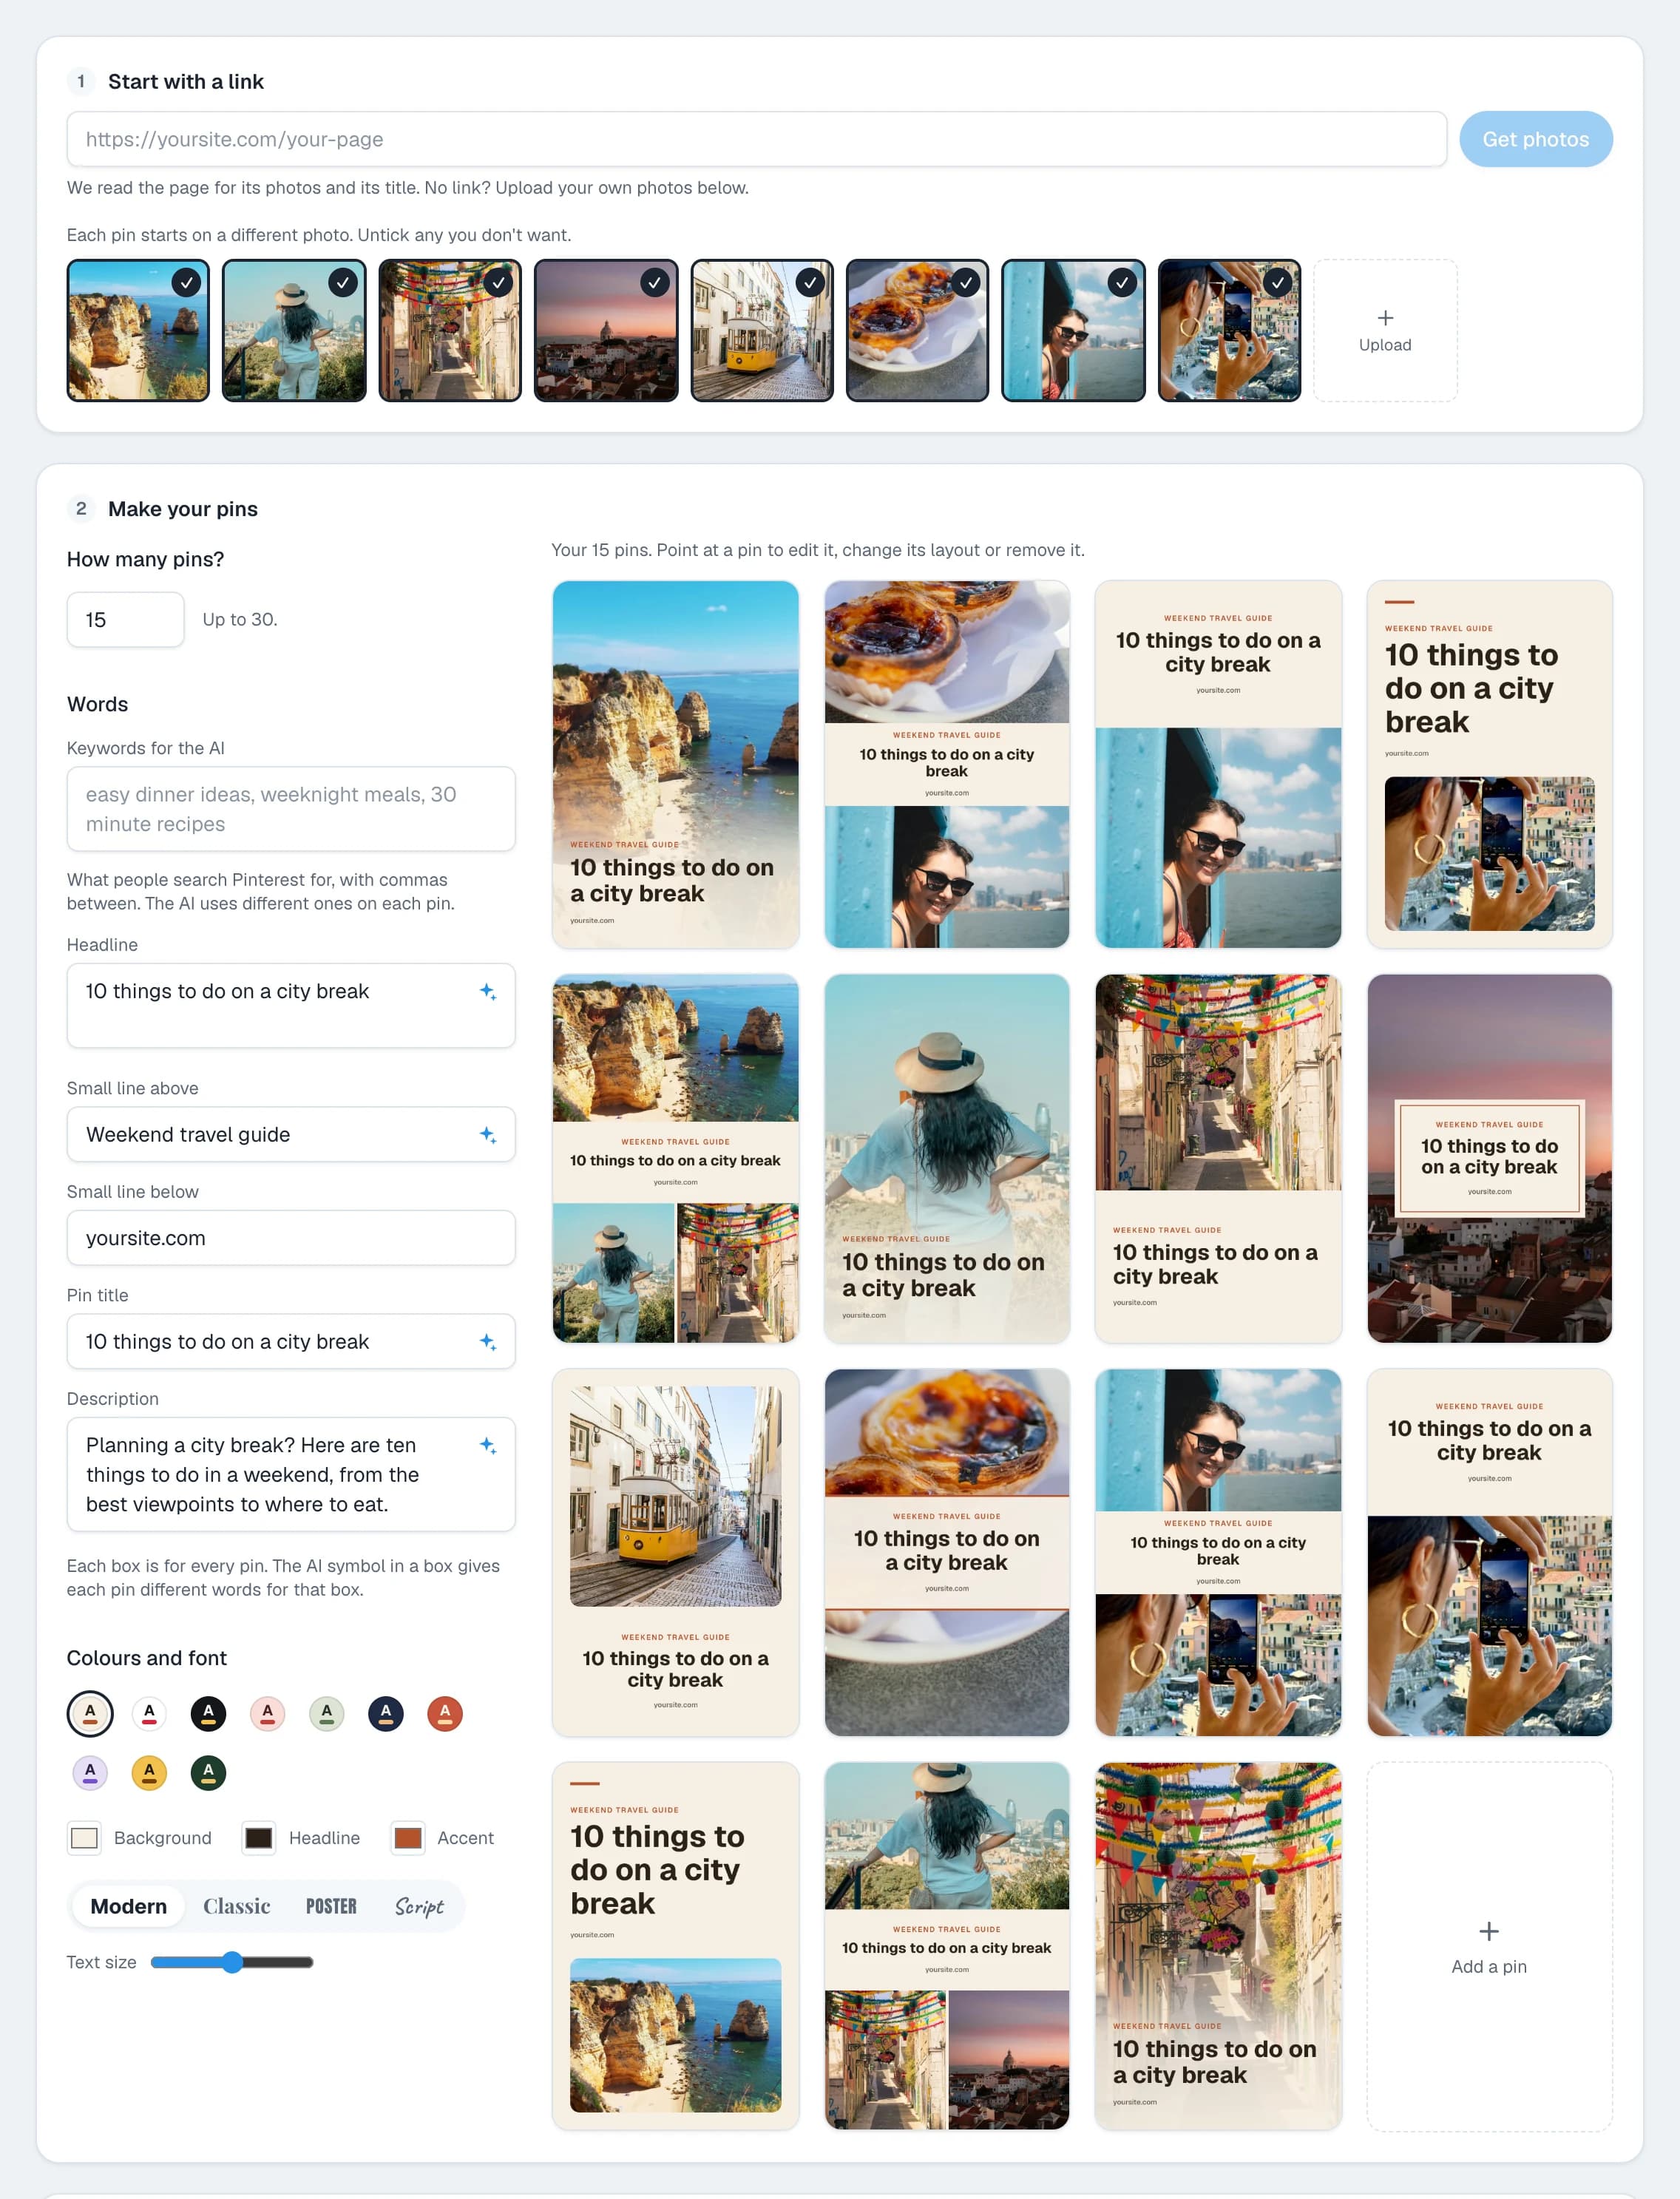
- Paste the address of your page in the box under Start with a link.
- Press Get photos.
Posttyy reads the page for its photos and its title. The photos show as small pictures, all ticked. Each pin starts on a different photo. Untick any photo you do not want. You have no link? Upload your own photos there.
Step 2: Choose how many pins
Under How many pins?, type a number up to 30. The page starts with five. Your pins show at once, large, on the right. Each one has a different photo and a different layout, and each is 1,000 × 1,500 pixels, the tall 2:3 shape Pinterest recommends.
Step 3: Check the words
The pins already have words. The headline comes from your page's title, and the small line below is your site's address. Under Words there is a box for each part:
| Box | Where it shows | Limit |
|---|---|---|
| Headline | Printed on the pin | Short is best |
| Small line above | Printed above the headline | A few words |
| Small line below | Printed at the foot of the pin | Your site address |
| Pin title | Under the pin on Pinterest | 100 characters |
| Description | Under the title on Pinterest | 800 characters |
Each box is for every pin. Type in a box and all your pins change as you type.
Step 4: Give each pin different words (optional)
The same title and description on 30 pins is a missed chance. Each pin can be found for a different search. To give every pin its own words:
- Type what people search for in Keywords for the AI, with commas between. For example: easy dinner ideas, weeknight meals, 30 minute recipes.
- Click the AI symbol in a box, such as Description. Its label is Write with AI.
- Posttyy writes a different description for each pin. It uses different keywords on each pin, so all of them are used across your pins.
The AI is your choice. Posttyy never runs it unless you click.
You can also type one pin's words yourself:
- Point at the pin and click the pencil icon. The Edit pin window opens.
- Under Words on this pin, type the headline. The pin beside it changes as you type.
- Under On Pinterest, type the Pin title and the Description.
- Press Done.
When pins have different words, the box for those words reads Each pin has its own. Click it to write one for all of them again.
Step 5: Change the look
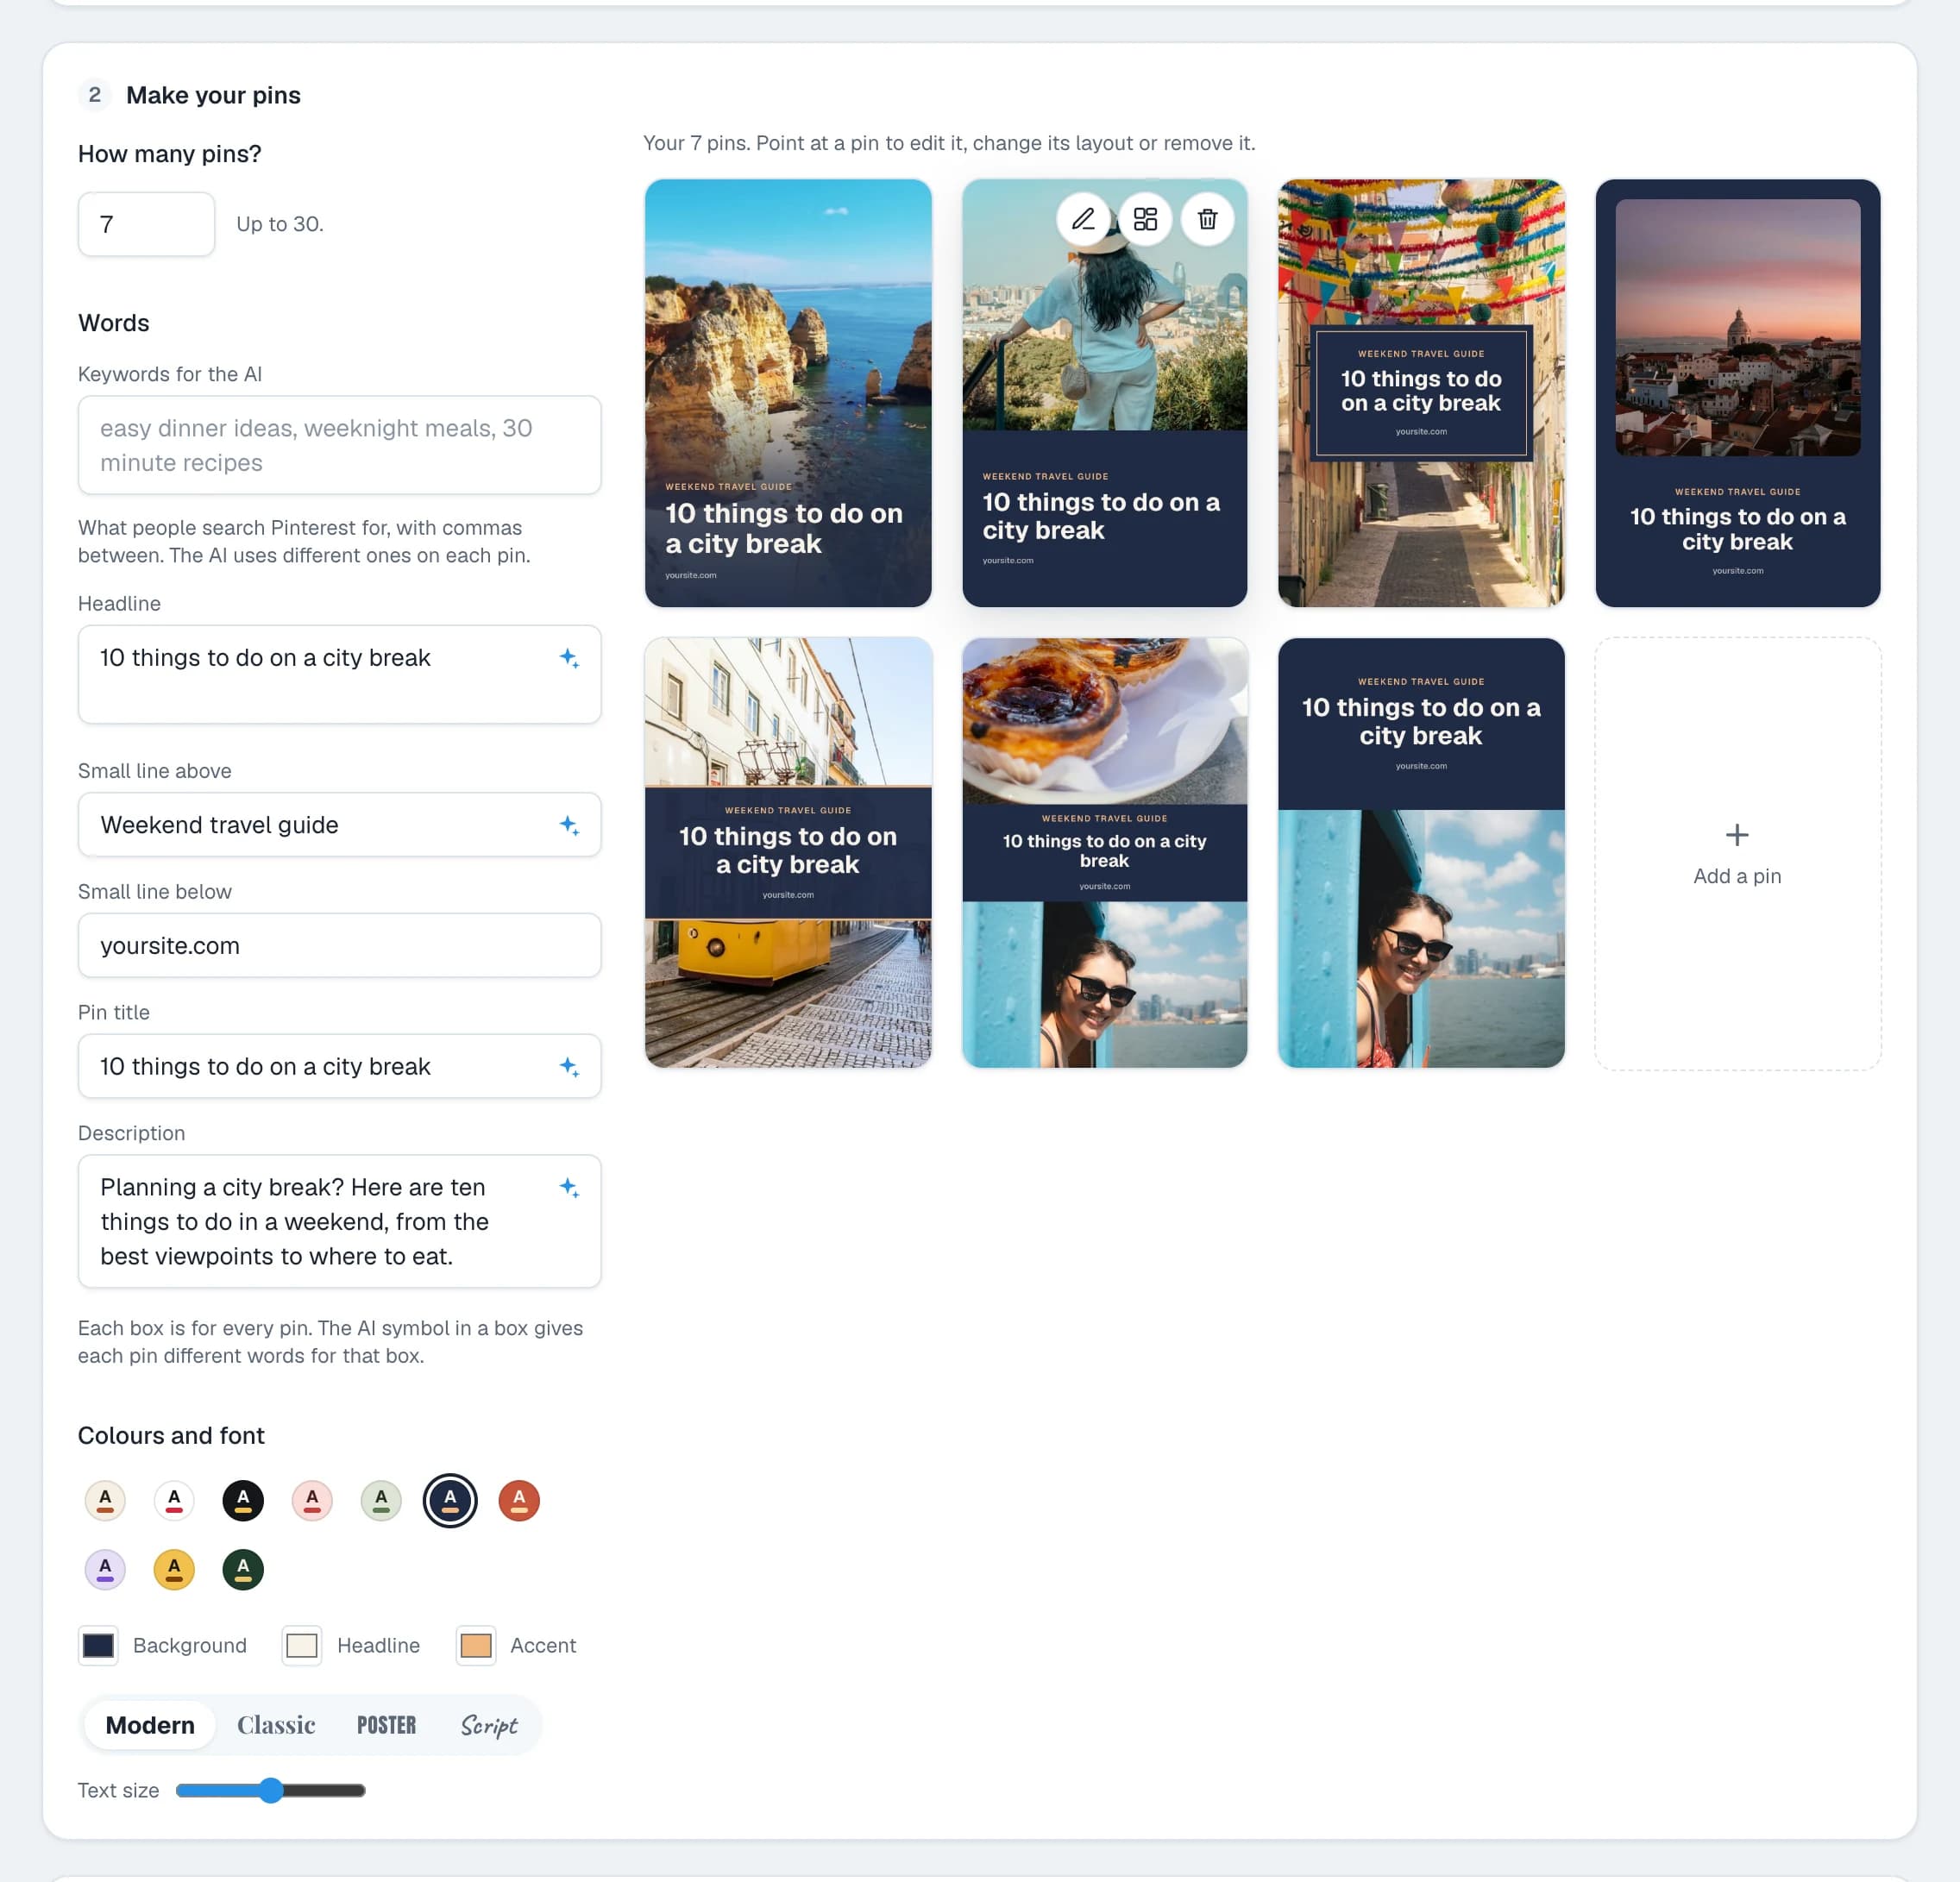
- All pins. Under Colours and font, pick the colours and the headline font. Every pin changes at once, so you see the result before you choose.
- One pin. Point at a pin. Three icons show: edit the pin, change its layout, and remove it. The edit window lets you change that pin's words, photo, layout and colours.
- One more. Press Add a pin at the end of the row.
Step 6: Choose a board and a link
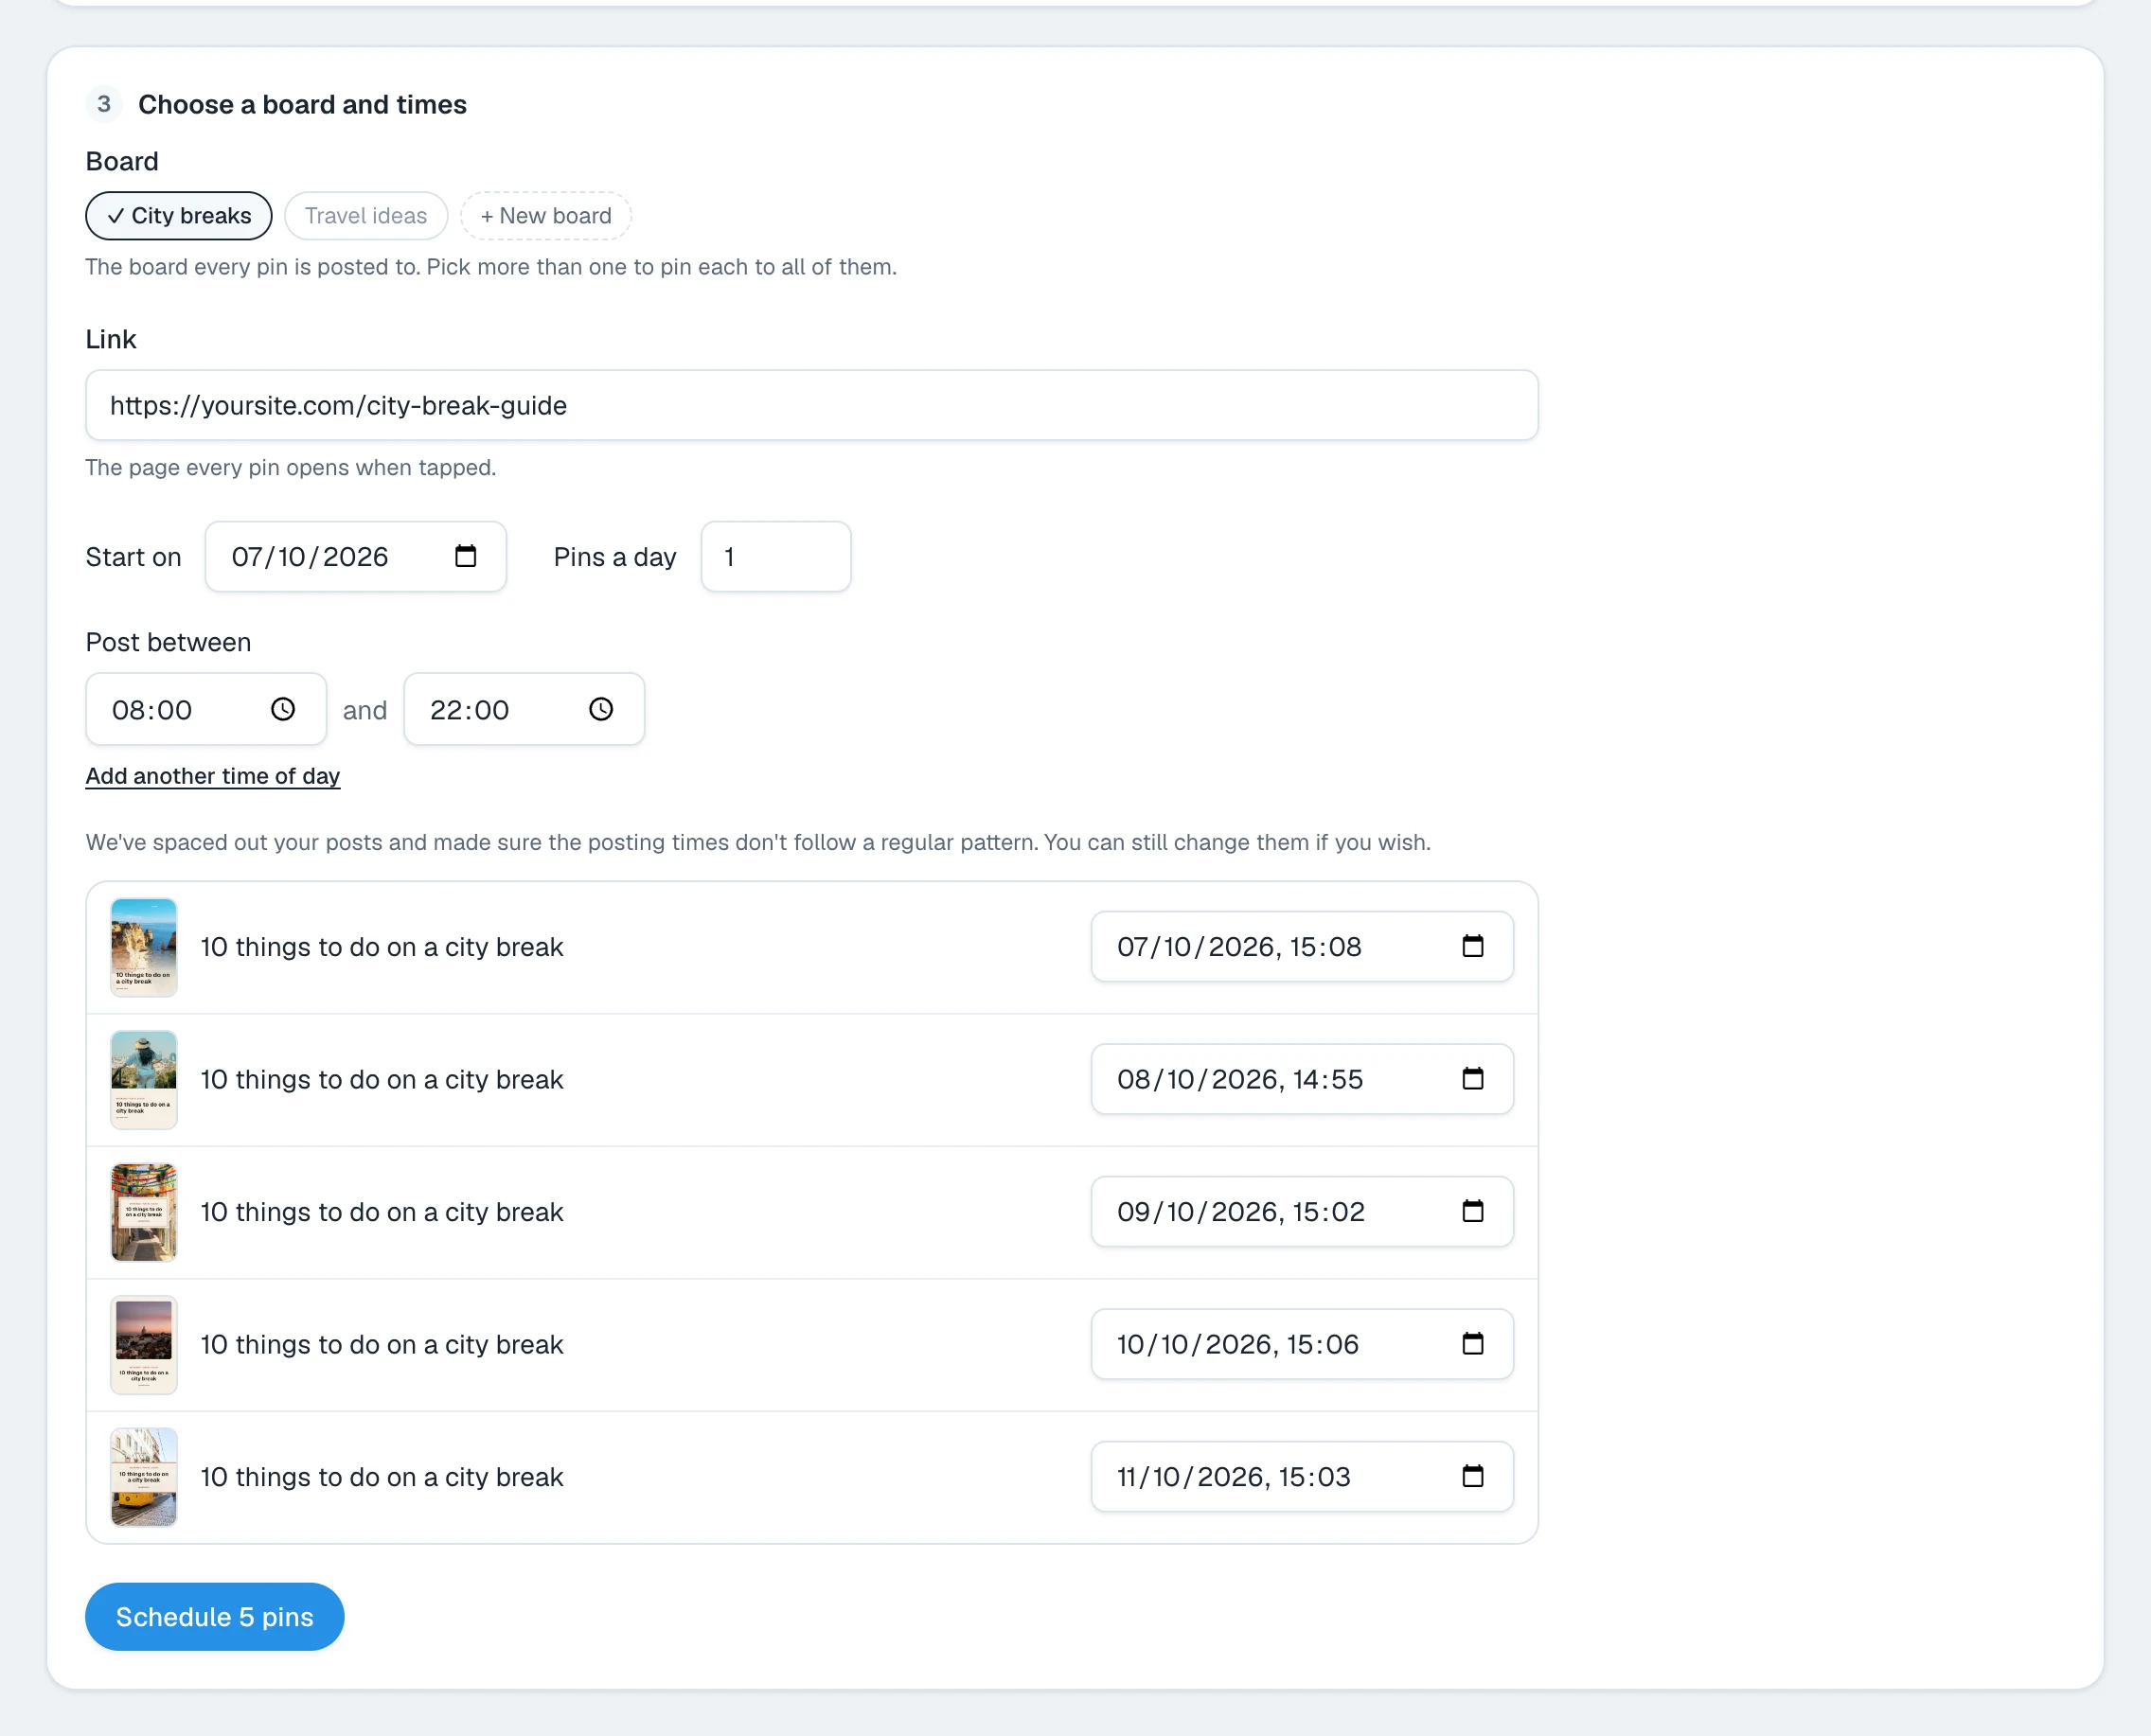
- Board. The board every pin is posted to. Pick more than one to pin each to all of them. Press + New board to make one.
- Link. The page every pin opens when tapped. Posttyy fills it in from the link you pasted.
Step 7: Spread the pins over the coming days
Three settings decide when your pins go out:
- Start on. The first day. It starts as tomorrow.
- Pins a day. A number up to 100. With 1 a day, 30 pins last 30 days. With 3 a day, they last 10 days.
- Post between. The hours pins may go out. It starts as 8am to 10pm. Press Add another time of day for a second stretch, such as a morning and an evening.
Posttyy spaces the pins evenly through those hours. Then it moves each time by a few minutes, so the times do not follow a regular pattern. Every pin shows its time in a list, and you can change any of them.
Step 8: Schedule
Press the button at the bottom. It shows the count, such as Schedule 5 pins. Posttyy saves each pin as an ordinary scheduled post, and each one gets a Scheduled label.
The pins are now on your calendar. You can move, edit or delete each one there like any other post. Press See scheduled posts to look at them, or Make more pins to start on the next link.
Method 2: Pinterest's own bulk upload
Pinterest has a bulk tool for business accounts. It does not make pins. It uploads pictures you have already made, from a list in a CSV file (a spreadsheet saved as plain text).
- Design every pin picture yourself.
- Put each picture online at a public address. Pinterest needs a link to the file itself.
- Make a spreadsheet with one row for each pin. Each row needs a title, the picture's address and the board's name. You can add a description, a link and a publish date.
- Save the spreadsheet as a CSV file.
- On Pinterest, open Settings, then Import content, and upload the file.
One file holds up to 200 pins. A row with no publish date is pinned at once. Publish times in the file are in UTC, so you must convert them from your own time zone.
Which way should you use?
| Posttyy Bulk pins | Pinterest CSV upload | |
|---|---|---|
| Makes the pin pictures | Yes, from your link | No, you make them first |
| Pins in one go | Up to 30 for each link | Up to 200 for each file |
| Writes titles and descriptions | From your page, or with AI | No, you type each one |
| Picks the times | Yes, spread over the days you set | No, you type each one in UTC |
| Shows the pins before they go out | Yes, every pin | No |
| Change a pin later | On your calendar | On Pinterest, one at a time |
| Price | Part of every Posttyy plan | Free with a business account |
Use Pinterest's upload when you already have hundreds of finished pictures and a spreadsheet. Use Posttyy when you have pages to promote and no pins yet.
How to bulk post without looking like spam
- Do not post them all at once. Thirty pins to one link in one minute looks like a machine. Spread them over days.
- Make each pin different. A different picture, a different headline and a different description. The same pin posted again and again is what Pinterest treats as spam.
- Mix your links. Make a batch for each of several pages, and start them on different days.
- Use the right board. Pinterest reads the board to understand the pin. Put a recipe pin on a recipe board.
Common questions
How many pins can I bulk schedule at once?
Up to 30 pins for each link in Posttyy. There is no limit on how many batches you make, so make another batch for the next link.
Do I need a spreadsheet or a CSV file?
Not with Posttyy. You paste a link and the pins are made for you. Pinterest's own bulk upload needs a CSV file.
Do I need a design tool like Canva?
No. Posttyy makes each pin picture from your page's photos, with your words on it, in the tall 2:3 shape Pinterest recommends.
Can each pin have a different title and description?
Yes. Click the AI symbol in the Pin title or Description box and Posttyy writes a different one for each pin. You can also open one pin and type its own words.
Can I use my own photos instead of a link?
Yes. Upload your own photos on the Bulk pins page. You can also use them together with the photos from a link.
Can I change a pin after I schedule it?
Yes. Each pin is an ordinary scheduled post on your calendar. You can move it to another time, edit it or delete it.
Can I bulk schedule video pins?
Not yet. Bulk pins makes picture pins.
One pin at a time is covered in the guide to scheduling Pinterest pins. For ideas on what to change between pins, see how to make multiple pins for one blog post.